Picket Fence Frame
- Jan 12, 2016
- 3 min read
My mirror is my oldest friend. Laugh all you want. It has let me paint, decorate, and hot glue it with gusto. It has hosted wooden animals, yellow daisies, wood putty and spray paint. Since it was being such a good sport about all this body alteration, I let my mirror follow me to my first apartment. It has been hanging on my bedroom wall for two years, staring back at me each morning with an out of place bright orange frame.
To bring my old friend into 2016, I wanted to sand down the wooden frame and stain it. What a fool I was. Once I got closer I realized I was lied to for my entire life- the frame was PLASTIC! But I was in too deep. It was time to make a new frame.
An ambitious undertaking for someone who knew nothing about mirrors, perhaps.
Step 1: Free the Mirror

For me, this was as simple as removing a handful of screws and lifting the mirror out of the existing frame. Luckily the mirror DID turn out to be a mirror and not a liar like the frame. I kicked frame to the curb and moved on.
Step 2: Grab your Notebook
Time to get your design juices flowing. I knew I didn't want to use any silicon or glue to secure the back of the mirror because i figured I may (will) want to change it again one day. I also didn't want it to be too heavy, expensive, or involve any complicated wood cuts. Here's what I came up with:

The mirror dimensions are used to determine the height and width of the back. It's kind of like a picture frame, pretty standard.
Step 3: Head to Lowe's

You'll only need two types of wood: Wood for the front of the frame and wood for the back of the frame.
I was going for more of a reclaimed wood appearance, so I grabbed some fence pickets for the front of the frame (less than $2 each). For the back of the frame, as well as for the pieces of wood used to secure the mirror, I chose a sheet of plywood (less than $8) that was slightly thicker than the mirror itself (mirror was 1/8" and the plywood was 1/4"). I also got about seven splinters during the process of carrying this crap to the register.
Step 4: Measure Twice, Cut once

Cut the fence pickets to size and give them a rough sanding because splinters. Next, cut the plywood into strips with the correct width, based on the design you sketched up. These strips will be used to secure the mirror in place as well as frame it, so you'll have ten all together.
When you're done, lay all your pieces on a flat surface to make sure the pieces line up properly. Also double check to make sure your mirror will fit. If it doesn't, burn everything and start over.

Step 5: Assemble and Stain

The screws should NOT poke through the front of the frame, unless you're going for more of a death trap type of aesthetic (to each their own).
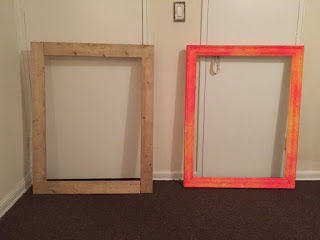
An after / before pic:
The final look I achieved involved some really complicated techniques. I took some random wood stains I had laying around and wiped them on with a dirty rag. I wanted it dark, so I did a lot of messy wiping on and didn't bother to wipe the excess off. You can try this technique, but don't expect it to look as good as mine did.
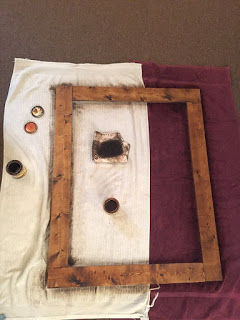
After a day or two I used another dirty rag to wipe on a bunch of wood wax and it ended up looking like this (I know, Gorgeous!):

Step 6: Install the Mirror

Put the mirror in place and lay in your cardboard. Use the plywood strips to secure all four corners, and place one or two strips across the width. Don't do anything stupid. You can purchase a mirror hanging kit on amazon, or just use a sketchy old wire like I did for free. Then hang that puppy up.
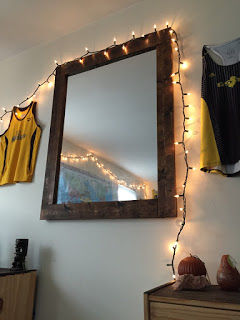
Viola! New mirror frame.
-vivalakelc


Comments